
Overview
One of the great things about Clear Estimates is preloaded labor rates, sourced directly from your area! These rates are already included in your account when you sign up.
Keep in mind that these labor rates are pre-markup and pre-tax, so they are the average labor cost you would expect to pay out, hourly, for a variety of different trades.
Labor rates are the hourly cost of performing tasks without overhead & profit. Included is the basic wage paid, Unemployment Insurance, Workman’s Compensation, Social Security and Medicare, and 9.75% for benefits such as vacation, sick leave and medical benefits.
Electrician and Plumber rates also include an additional 33% surcharge because they are assumed to be sourced from a subcontractor.
The trade specific rates included are:
TRUCK DRIVER |
TRCK |
Locally Sourced |
LABORER |
LABR |
Locally Sourced |
TILE SETTER |
TILE |
Locally Sourced |
CONCRETE |
CONC |
Locally Sourced |
CARPENTER |
CARP |
Locally Sourced |
PAINTER |
PNTR |
Locally Sourced |
MASON |
MASN |
Locally Sourced |
EQUIPMENT OP |
OPER |
Locally Sourced |
ROOFER |
ROOF |
Locally Sourced |
ELECTRICIAN |
ELEC |
Locally Sourced |
PLUMBER |
PLUM |
Locally Sourced |
HANDYMAN |
HAND |
National Average |
Your labor rates are yours, so you can adjust the suggested rates however you see fit! You can also add in your own proprietary labor rates.
One of the first recommended steps in Clear Estimates is to take a look at your labor rates, and make any adjustments if needed. In this guide, we'll talk about how to view & customize your labor rates!
Viewing Your Labor Rates
To see the rates in your account, head to Tools > Options:

Within Options, find the Labor Rate Editor from the menu on the left:

From here, you can find all the labor rates in your account. They are listed on the right side of the page. You'll see a column for the Letter, Title and Rate:
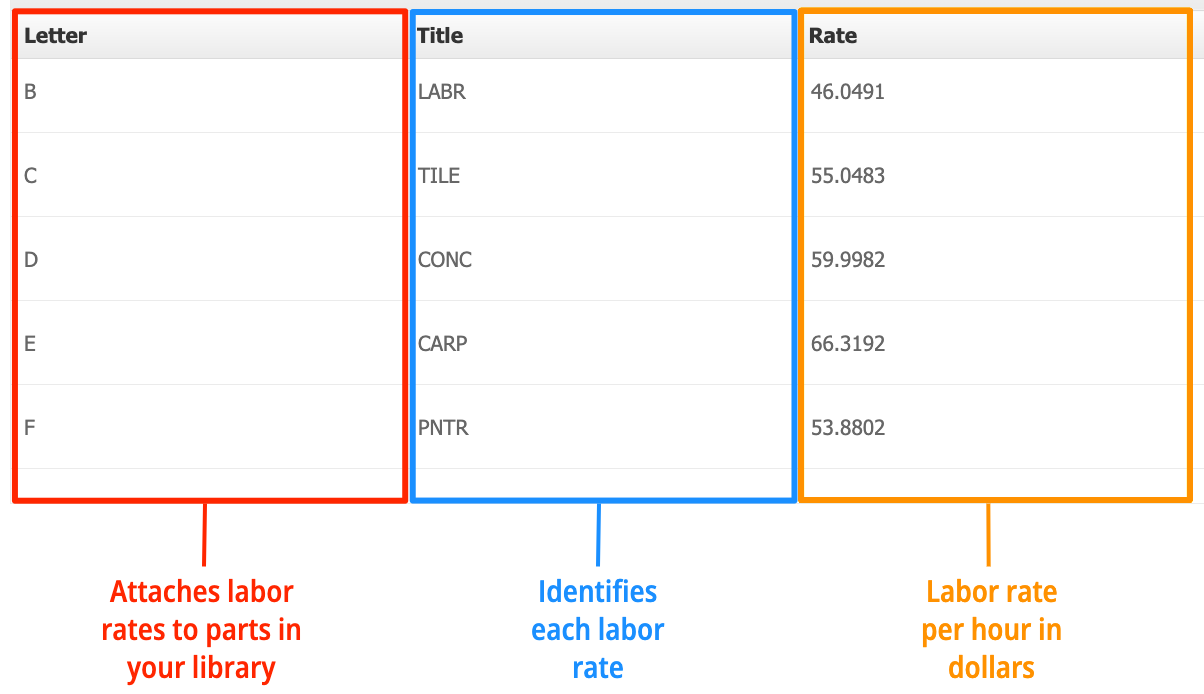
Letter
The labor rate letter is used by the system to attach different labor rates to parts. The only time you'll really use this is when importing a list of parts. You'll use the labor rate letter to tell Clear Estimates which labor rate to use for your imported part.
Title
This is how you'll identify your labor rates. When you click the “Labor Rate” dropdown in your parts editor, you'll see your labor rate titles. If you're customizing labor rates (see below), your title can be any 4 characters.
Rate
This is the actual rate itself. This represents the dollar amount per hour to use for labor when calculating your labor cost.
Editing Your Labor Rates
Your labor rates are yours, so its easy to tailor them to your business! We do provide suggested rates from your area, but if you'd like, you can also adjust the rates we provide. You can even add in new labor rates, on top of what is provided.
It is important to never delete the rates we provide. These rates are tied back to different parts in your part library, so deleting the rates can cause problems with your parts.
Instead, you can click into the Rate column and adjust the rates we provide.
If we pay an electrician $40 per hour, we can simply find the ELEC rate, and click into the rate to adjust:

After any changes you make, click Save Changes at the top:
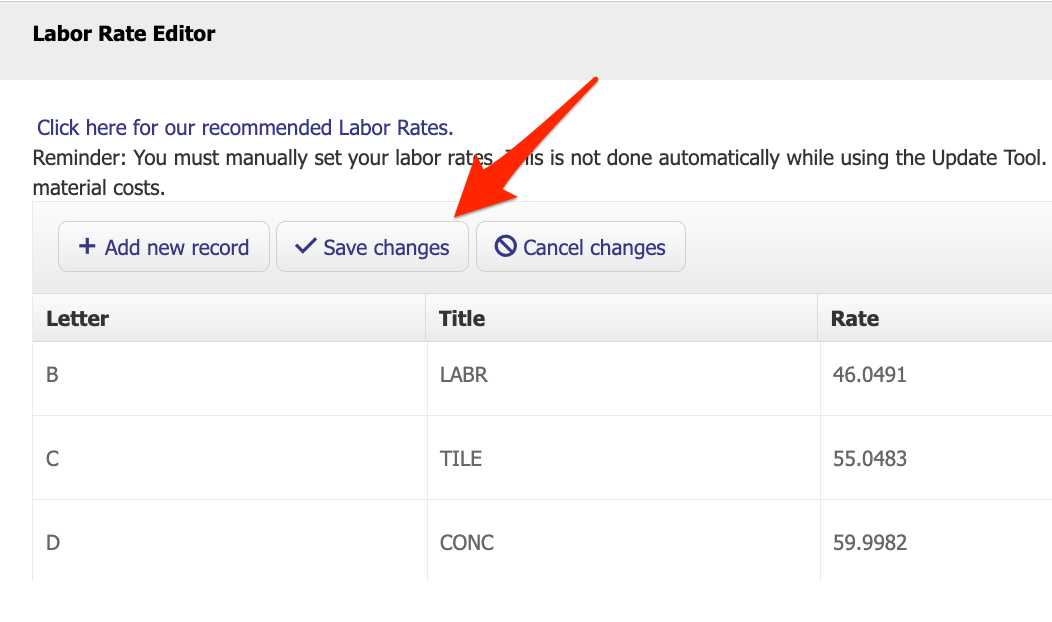
This will automatically update the default rate for any parts that use the ELEC rate in your library.
So, any rates can easily be adjusted here - and your new rates will be used in all your estimates going forward!
Adding New Labor Rates
Adding in new rates is easy! You can do that in just a few steps:
First, click Add New Record:
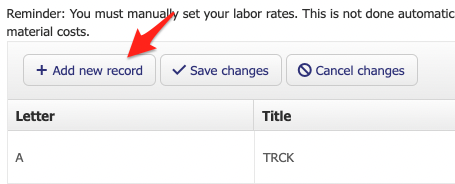
You'll see a blank row appear at the top of your labor rate list. Add in a letter for your rate. Be sure your labor rate letter isn't already used by another part. You may want to start with letter M.
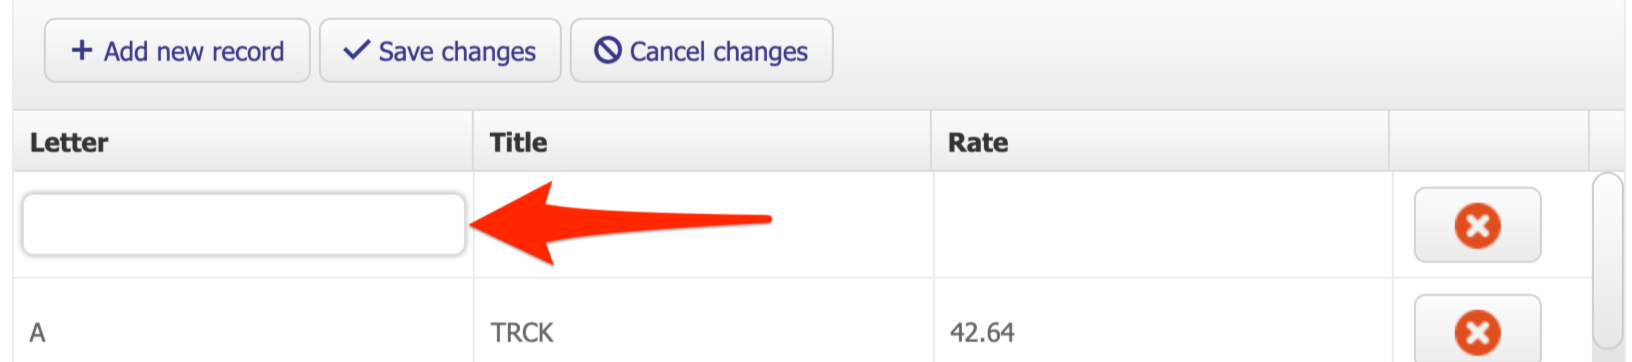
Next, add a title for your rate. This can be any four (4) letters or numbers. Lets say this is an additional labor rate for a drywaller. For this example, we'll just call it DRWL.
Click into your Title column, and type in your title: 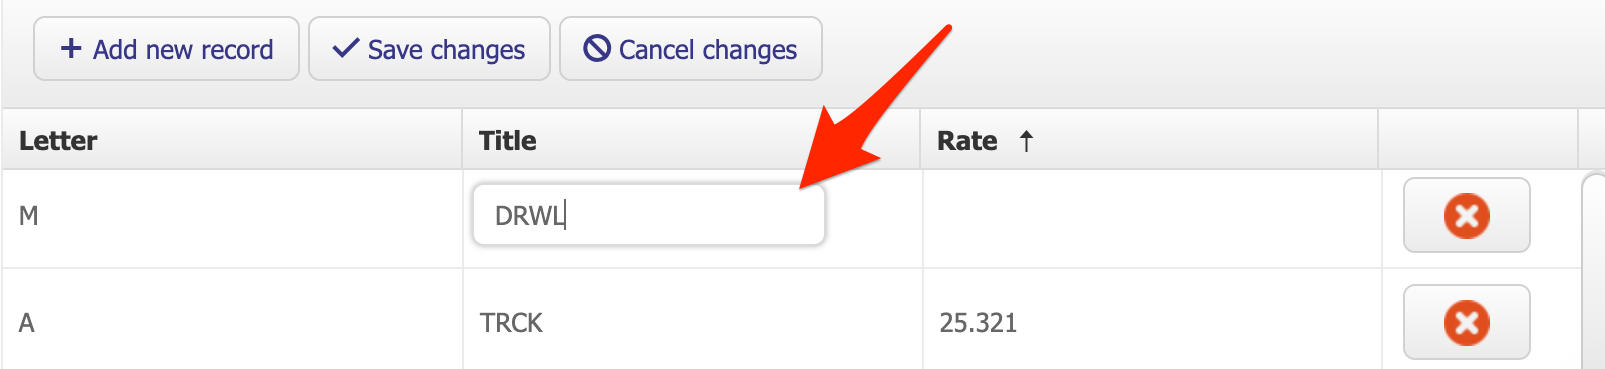
Lastly, we'll add in the rate itself. In this example, we'll use a rate of $66.31. 
Click Save Changes at the top, and your new rate will saved!
Now you'll be able to select your labor rate when adjusting part costs within your project.
Note: If you have any parts that you want to use your new labor rate by default, you'll need to adjust that from your Parts tool. We'll cover all of this in a later chapter!
Using Rates from Different Locations
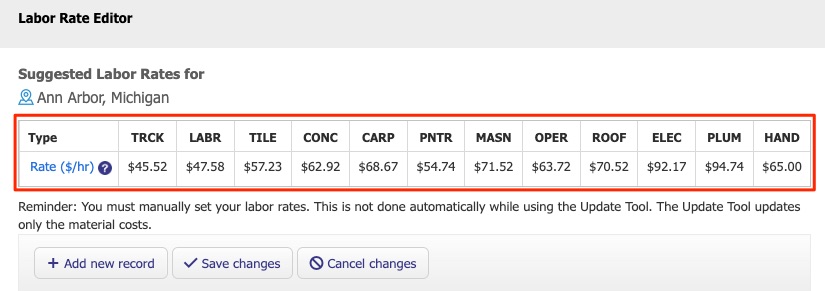
You'll start off with your local labor rates for the current year. You'll see those suggested rates at the top of the Labor Rate Editor:
What if you're estimating in a different location? No problem! We provide you the list of labor rates from every area we serve.
To find rates for a different location, first update your location settings from Tools > Price Update:

Here you can select a new location and click Refresh. This will sync your library to your new location.
This guide will show you the full steps.
Once you've updated your location from Price Update, you'll see new rates listed in the Labor Rate Editor for that location.
Now that you have recommend rates listed for the new location at the top, you can click into any of your labor rate columns and copy & paste the recommended rate:
Once everything looks good, click Save Changes at the top.
Congratulations! You've set up your labor rates. Now your labor rate settings will be used for all of your projects, going forward.