
Template Calculations
If you've worked with templates or seen our tutorials above, then you know that in order to add a template to your estimate you need to enter a quantity such as a square footage. For example, if you're using a deck template, you'll need to specify the size of the deck that you are working on, in square feet, and the template will calculate the quantities of each of the items you need.
In this tutorial, we'll discuss how these calculations work, how you can use them in your templates, and how can create extremely custom calculations for your needs!
First, what are templates?
Templates are pre-made lists of parts in Clear Estimates that help you start creating estimates extremely quickly. Clear Estimates provides you with hundreds of templates right out-of-the-box so you can get started working with templates easily! You can also create your own templates or modify the ones we have.
To learn more about templates, how to use them and how to create them, please view our tutorials.
Create or Edit Templates
▶️ Working with Templates ... ...
Continued Learning
Click here to learn how to save projects as templates:
To learn about template formulas, click here:
Understanding Template Formulas
For a quick overview on duplicating editing templates, click here:
Overview - Template Customization
Click here to learn how to add templates to an estimate:
Add Templates to Your Estimate
Need to change template part prices or descriptions? Here's how:
Customizing Parts in Your Library
Add Templates to Your Estimate
▶️ Add Templates to Your Estimate ... ...
Template Units & Template Quantity
First, we should discuss templates as a whole. Each template has its own assigned "Unit Type" such as square feet, linear feet, pieces, etc. This unit type is related to the unit type of the template or project itself, rather than any specific item within the template. In the image below, you can see where in the "Template Tool" you can view or change the unit type of this particular template. 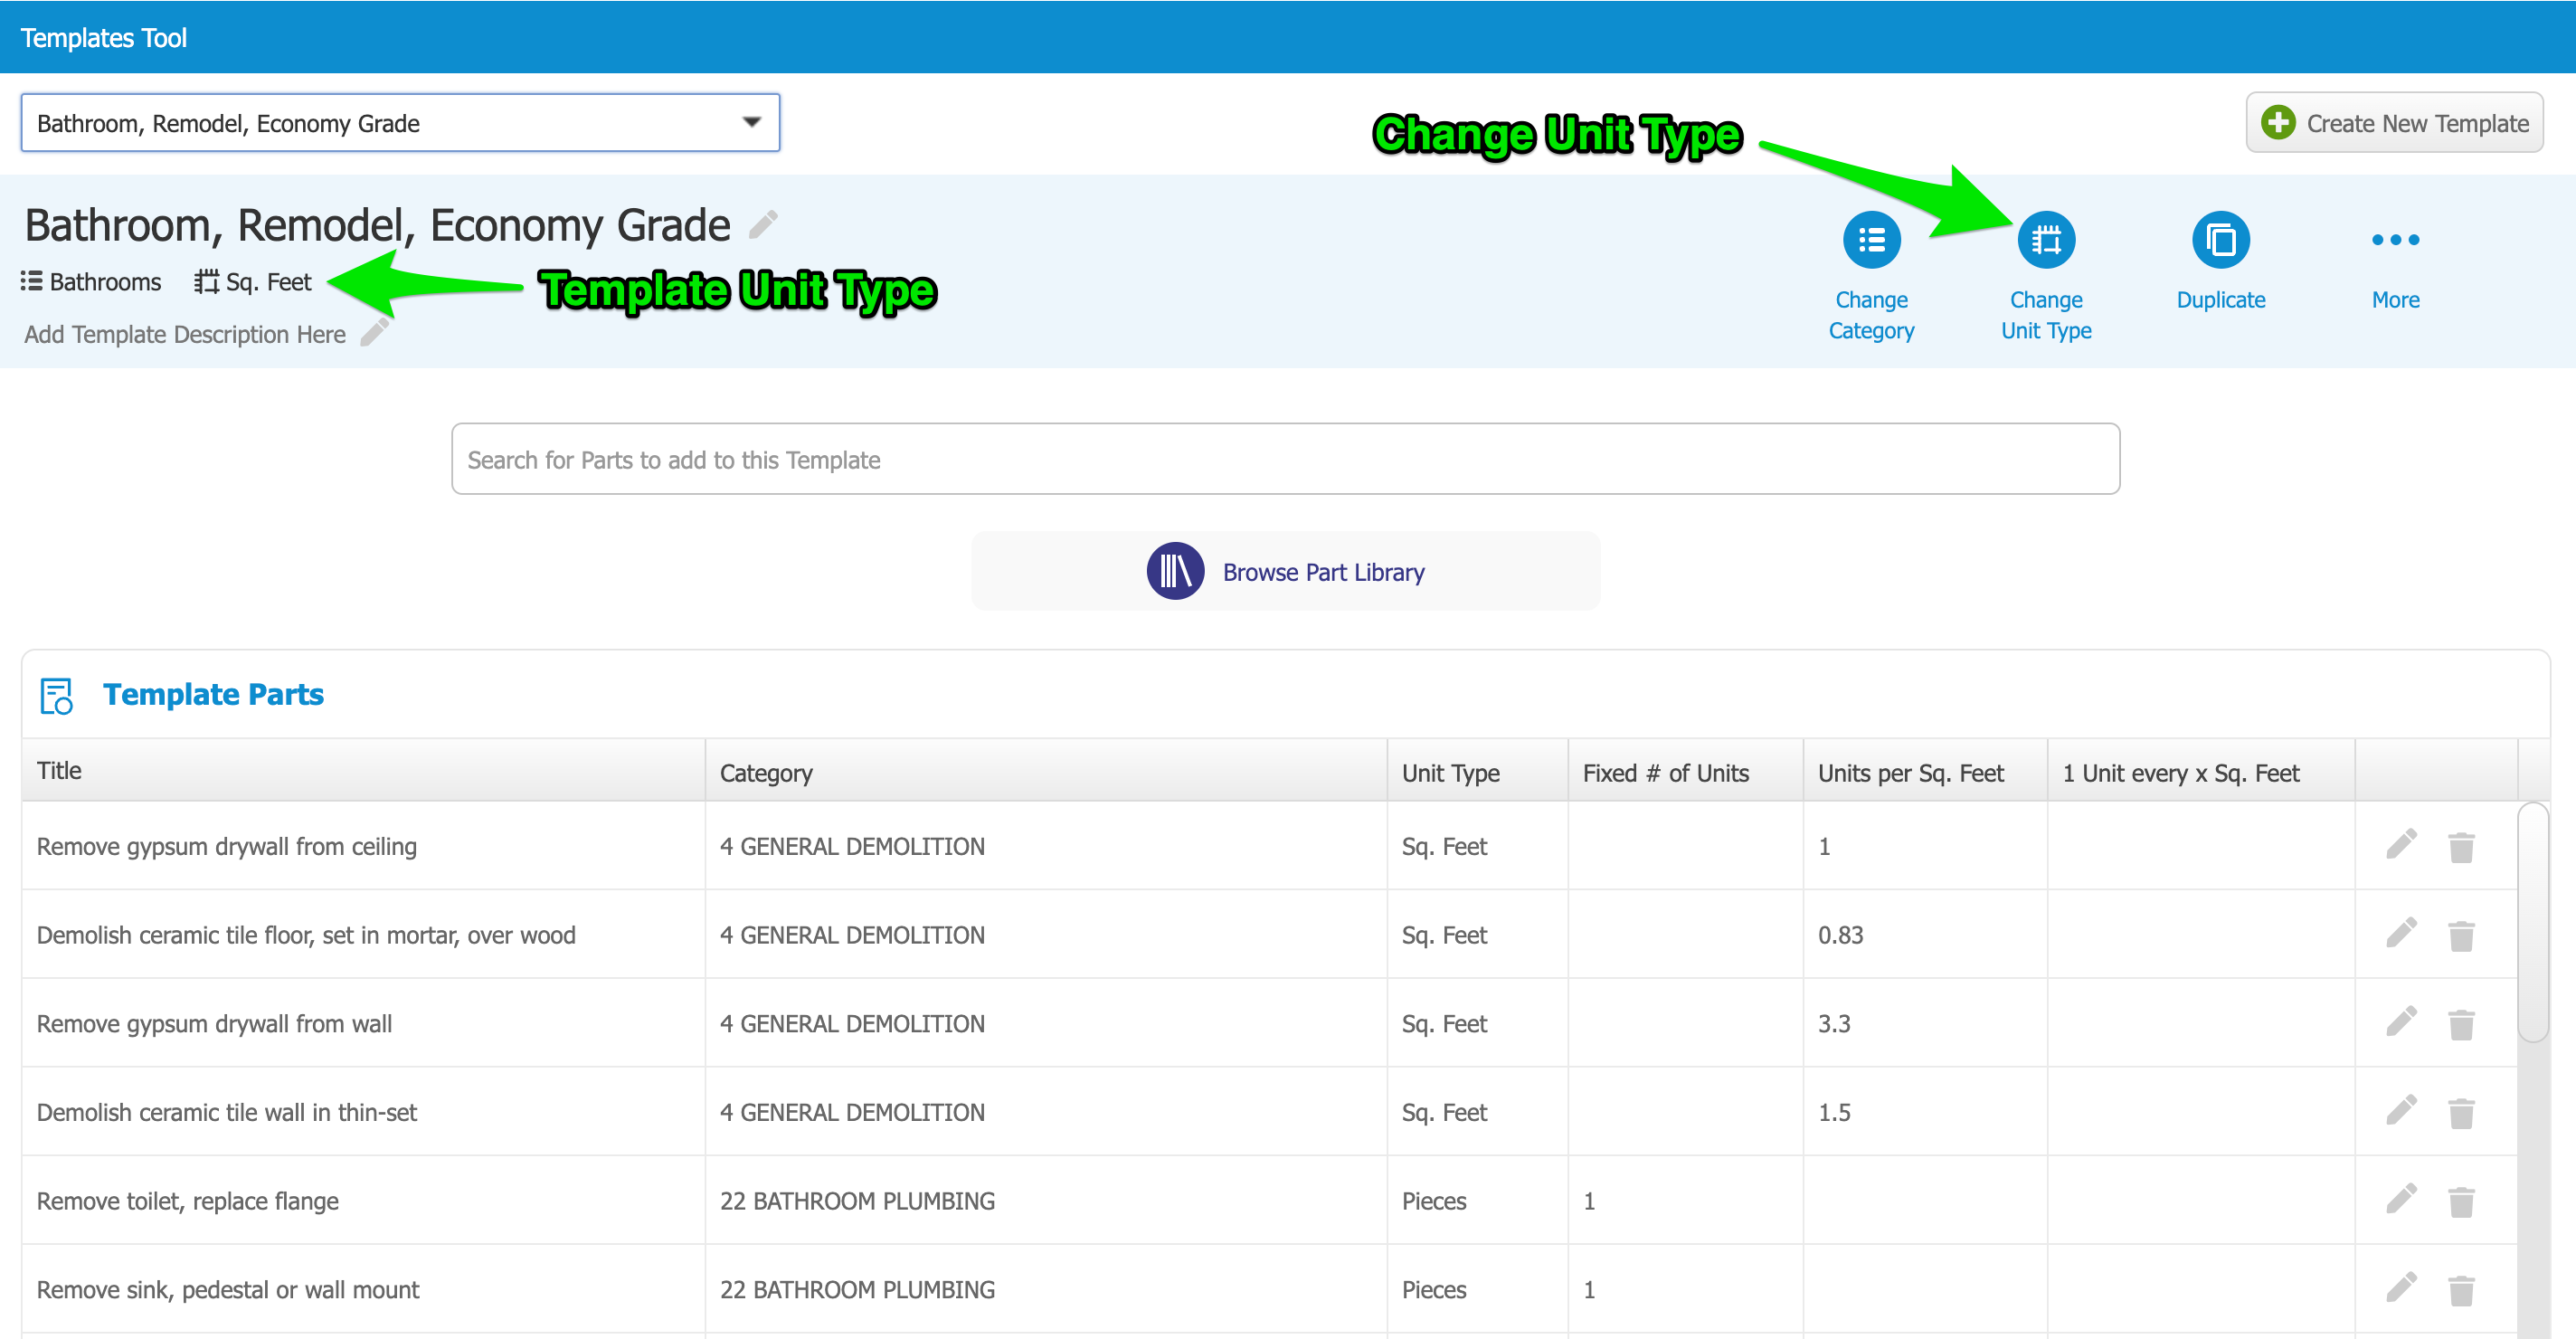
For example, let's say we're talking about a bathroom template. You would most likely use the "Square Feet" unit type, since the size of the bathroom is going to be measured in "Square Feet". For this reason, most templates you see will be in the unit of "Square Feet" since it is extremely common for projects to be measured in that unit type. Think of the size of a room for a remodel, size of a bathroom or kitchen, size of a deck, amount of roofing to install, amount of painting to be done, or the size of an addition.
But other unit types can be used as well! For example, a fencing template might use "Linear Feet" since you would most likely measure the fence project in that unit type. You could use "pieces" for things like a hot water heater replacement, where you would say that you are doing "1 hot water heater replacement" instead of a certain square footage or linear footage.
When you are actually adding a template to your estimate, you'll enter the "Template Quantity" which is the quantity for that template, using the units discussed above.
Take a bathroom example again which is set up in "Square Feet" unit type. When adding this template to your estimate, you'll enter a size of that bathroom in square footage such as 48 square feet. When you do that, the template will use the 48 square feet to calculate the quantities for each of the parts that the template includes such as tile flooring, drywall, painting, sinks, toilets, showers, etc.
Each of the parts in your template will have their own formula for how use the "Template Quantity" and calculate the part quantity. In the example above, the quantity of each part based on the formula set for the part and the Template Quantity of 48 Square Feet for the bathroom.
Next, we'll discuss how those formulas & calculations work and how you can create custom calculations.
Templates Formulas Only Calculate the Quantity
You may have noticed that we have so far been only taking about "Template Quantities" and "Part Quantities" with no discussion about the actual costs of a part such as material and labor.
This is because template formulas only calculate the quantity for a part. The formulas determine how many units of a part should be included in an estimate. The cost of those individual parts can be edited in your "Parts" tool or on a specific estimate.
Template Parts Calculation Types
There are three options you have for how each part in your template calculates its own quantity based on the template quantity.
- Fixed # of Units
- Units per (template unit type)
- 1 Unit every "X" (template unit type)
Here you can see on the Templates Tool where the calculations are set for each part in your template. You can use any combination of these calculations for a particular part in order for the template to work as you need!

Fixed # of Units
Probably the easiest to understand of the three different calculation types - this number never changes. Whatever number you put in for the "Fixed # of Units" is the quantity that that part will get on the estimate when you enter the template quantity.
Using the bathroom example again, this would probably make the most sense for a toilet where no matter what size of bathroom you're working on (within reason) you are mostly going to have just 1 toilet. And, you can see in the screenshot above that the "Remove toilet" part uses a Fixed unit of 1 as well, since the current bathroom probably only has one toilet for you to remove when doing your work.
This means that when you add this template to your estimate, and you type in a template quantity in square feet, let's say 48 sq. feet, the number of toilets will always be 1 because you've put 1 in as the "Fixed # of Units" for the toilet part. If you type in 100 square feet for a bathroom, you'll still only get 1 toilet calculated by the template.
Fixed # Units is best used when you "pretty much always" have the same quantity of a particular part regardless of the size of the project.
You are not "locked" into the template calculations
Let's say you're working on a bathroom project and the customer has requested you to remove 1 toilet, but re-install 2 toilets in the new bathroom.
Don't worry! You can still use this template for this estimate even though the "Fixed" calculation is only going to give you 1 toilet.
When adding a template to an estimate, you can still change the quantity of any part in the template manually. So you can still use the same bathroom template, then just adjust the toilet quantity to 2 for this particular project.
Units per (Template Unit Type)
The "Units per" or "Units per Square Feet" in the case where the template unit type is "Square Feet", will simply multiply whatever number you enter into this field by the quantity of the template. It is the most common calculation type since it is based directly off of the template quantity that you enter.
Let's take a look at the bathroom example again.
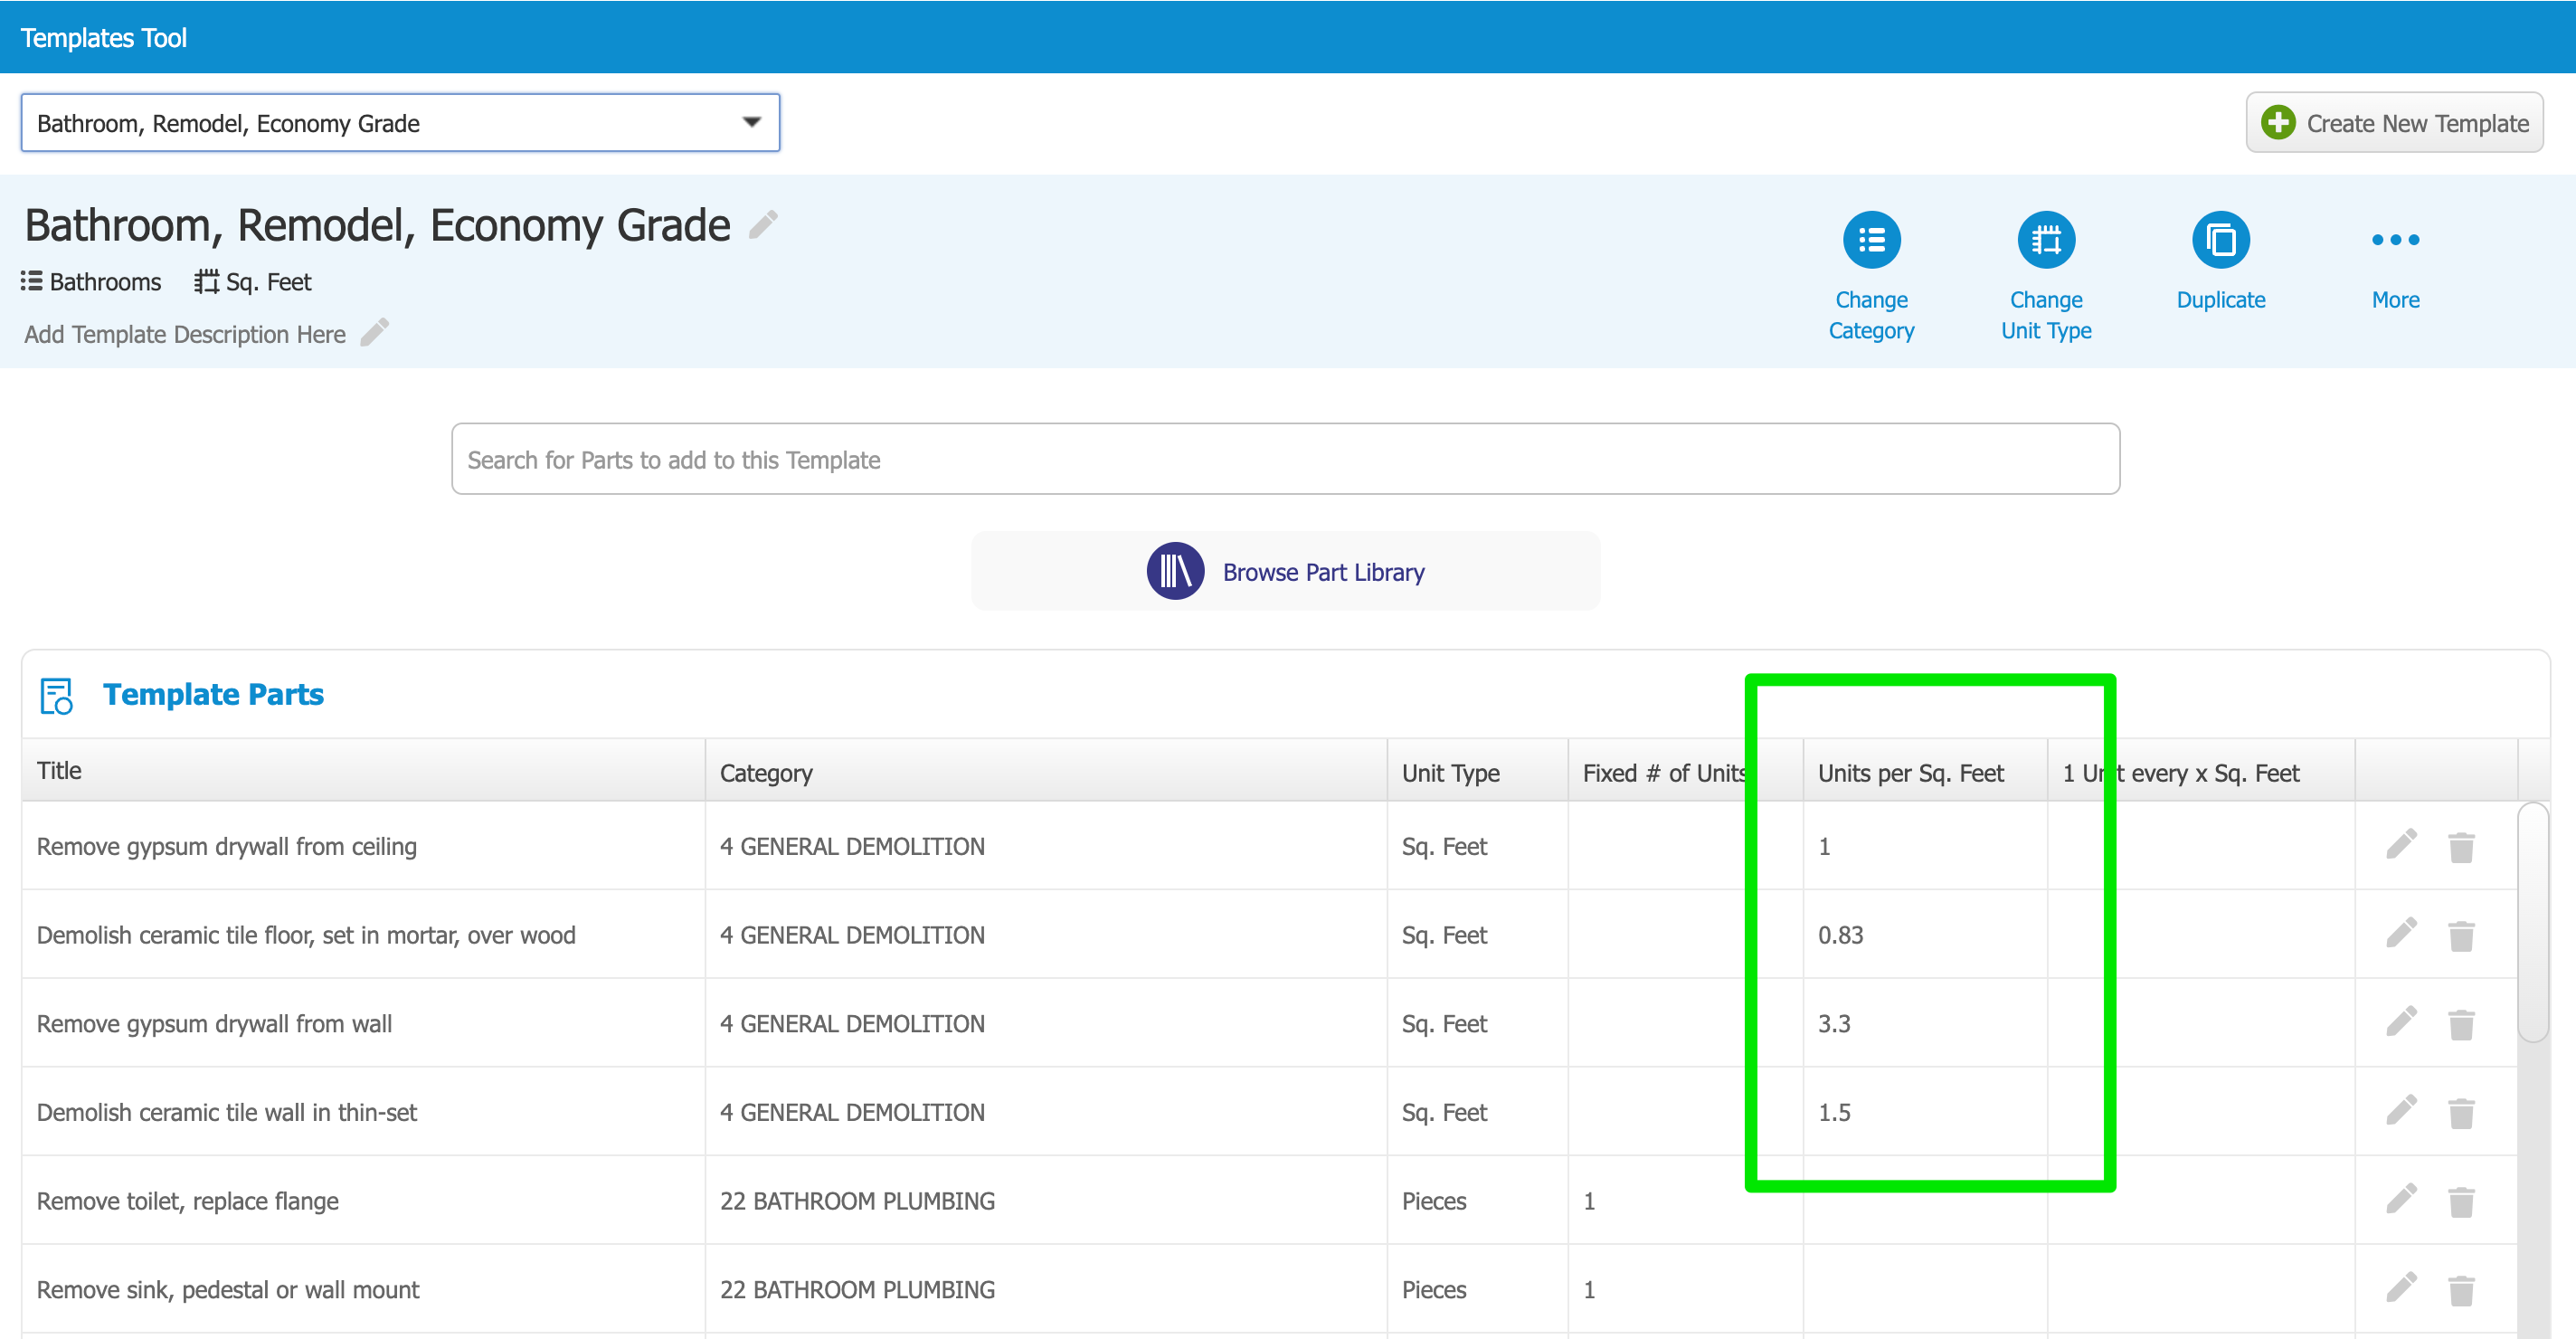
You can see that the first 4 parts are using the "Units per Square Feet" calculation option. When adding this template to your estimate and you type in a square footage of the bathroom (again, let's use 48 square feet), this template will multiply 48 times the number put in this column to calculate each part's quantity.
Note that this example uses "Units per Square Feet"because the template unit type is Square Feet. If the template unit type is "Linear Feet" or any other unit type, this column header would instead read "Unit per Linear Feet".
The first one in the list is "Remove Drywall from Ceiling" with a "Unit per Sq. Feet" of 1. This means that when I enter 48 square feet for my bathroom size, the template will calculate 48 square feet of ceiling tile removal. This makes sense because the ceiling size is going to be the same size as the bathroom itself, at least most of the time.
The next part in the list, "Demolish ceramic tile floor" has a different number - 0.83. This means that for each square foot of the bathroom, the template will include 0.83 square feet of ceramic tile removal. In our 48 Sq Foot bathroom example, this would mean 48 * 0.83 = 39.84 sq feet of ceramic tile removal. This particular template was set up by the Clear Estimates team and this part is meant to take into account that not all of the bathroom floor is going to be covered in tile. Areas such as the shower, under the toilet, or under the vanity may not include any tile flooring. So the 0.83 number accounts for some of the floor space not being covered with tile.
The third part down in the list, "Remove Drywall from Wall" is using another new number for the Units per Sq. Feet calculation - 3.3. Meaning that a 48 square foot bathroom will get 158.4 square feet of drywall removal. Again, this calculation is meant to account for the 4 bathroom walls as well as areas such as the shower where there is not drywall wall.
When creating your own templates or editing ours, you can easily adjust these numbers to reflect the projects that you typically work on. Is 3.3 square feet of drywall per square foot of bathroom too low for your projects? No problem! Change that to any number you need so it more accurately reflects your projects. And remember, you can always adjust the actual quantities when you add a template to your estimate.
1 Unit every "X" (Template Unit Type)
This is probably the most difficult to understand as well as the least used calculation type, but it provides a very unique way to calculate the quantities of a particular part. Think of it as a threshold that you set, and each time the template quantity (size of the bathroom) crosses that threshold, the template will add 1 more to the quantity of this part. Okay, that probably didn't help, let's take a closer look!
Using the bathroom example again, let's think about windows in a bathroom. A small bathroom is probably only going to have 1 window. It doesn't matter if its 48 sq feet, or 80 sq feet, most of the time that bathroom will have just 1 window. But what about an especially large bathroom, say 100+ square feet? Well, the exterior wall may be large enough to include multiple windows depending on the customer's needs.
What happens, then, if we set the "1 Unit every X square feet" calculation to 100? Well, in a bathroom that is 48 square feet, you would get 0 windows because the threshold of 100 has not been reached by the template. For a 99 square foot bathroom, you would also get 0 windows.
However, once that template quantity (bathroom size) crosses the 100 threshold, it will get 1 window. This process continues as the bathroom gets larger as well. At 150 square feet, the template will still only calculate 1 window because we have only crossed the 100 threshold one time. 199 square foot bathroom, still just 1 window. But a 200 square foot bathroom would now have crossed the 100 threshold twice, and it would calculate to 2 windows.
Another example might be for gates in a fence, where depending on how many linear feet of fencing you are installing, you may want a gate every 250' or so.
Or, electrical outlets. Based on the size of the room, you may need to add an extra outlet for every 50 square feet of a room.
Again, this is the least commonly used calculation type. So if it doesn't make sense or you can't think of a time when you would use it, no problem! You'll most likely be able to create many templates without ever using this calculation type.
Tips & Tricks
Start by Adding Templates to an Estimate
It can be very difficult to understand the template calculation process if you have not yet added some templates to an estimate. This is because when you are creating a template, you are really setting up a list of parts and a calculation. But, it can be hard to see how that looks on an actual project until you add a template to your estimate.
For that reason, we suggest using our templates as a starting point and get an idea of how the templates calculate the quantities of parts using the formulas above. You can add a bathroom template to your estimate, for example, by using a particular square footage. Then, open up the "Templates Tool" that we've been discussing here and see how the calculations are set up.
Once you have seen how these calculations work, you may find it a lot easier to create your own templates for the work you are typically doing!
Keep it Simple
Remember that when you're adding a template to an estimate, you can override any of the quantities calculated by the template for that particular estimate or project. This means you can fully ignore the quantities calculated by the template, if you want, and just type in whatever quantity you need for each part.
Because of this, there is a very easy to way to set up templates and you don't have to think about these calculations at all!
Simply set up every part in your template to be a "Fixed" calculation of 0. This means when you add your template to your estimate, each part will get a quantity of 0 no matter what size you put in. Then, you can just go down the list of parts in the template and change the quantity from 0 to whatever quantity you need for that part.
Using 0 as your Fixed calculation, in particular, means that the parts will get added to your estimate without any quantity. This will make it easy to see which parts have not been completed, since they will have no quantity and no cost associated with them. Once you change the quantities to the desired amount, you'll get the full pricing!
Sure, you won't get the advantage of having the quantities calculated for you. But, it means you can use templates as a pre-made list of parts so you don't have to go find all the items you need for a project each and every time. A kitchen template, for example, might have 50 or more items in it and maybe you don't want to have to go find each of those 50 items every time you estimate a kitchen. Well, create a template for that kitchen with 50 items and each item has a fixed quantity of 0. When adding that template to your estimate, you can just go down the list of 50 parts and enter the quantity.
This is perhaps not as fast and custom as using the calculations for your part quantities, but it still saves you some time from having to go find 50 items in the Part Library for each estimate. It can help you avoid forgetting items that should go in each estimate.
Use Multiple Calculation Types
This is the opposite of the previous suggestion, if you want to really get custom with your templates you can combine calculation types to create really interesting calculations!
Let's look at the electrical outlet example we mentioned above when discussing the "1 Unit Every X" calculation type. And, let's imagine a simple room remodel.
No matter if the room is 50 sq feet or 200 sq ft, its probably going to need at least 1 or 2 outlets. Then, depending on how large the room is, you may need to add additional to make sure you're including enough based on the room size.
To do this, you can use a "Fixed" quantity of 2 and a "1 Unit every X" of 100. This means that no matter what the template quantity you input for this room size, you'll always get 2 outlets. PLUS for every 100 square feet of that room, you'll get another 1 outlet.
A 50 square foot room, then, would get 2 outlets because you have the Fixed 2 but then the "1 Unit Every X" calculates 0 because the room is not at the 100 square foot threshold.
A 100 square foot room would get 3 outlets. The 2 fixed just as above PLUS 1 more since it reaches that 100 square foot threshold. A 200 square foot room would reach that threshold again, taking the total number of outlets to 4.
Create multiple templates for size variations
These calculations can have their limits and you may not always be able to create a calculation that matches all the different scenarios you might encounter.
For situations like this, feel free to create multiple templates for different variations. You can see this when you look at the pre-made templates for Decks or other categories from Clear Estimates. For decks in particular, we have 3 variations based on the size of the deck such as "below 120 square feet" and "120 to 180 square feet". This allows the calculations in each template to be more accurate since you know the range of sizes that could be used when adding the template to an estimate.
There are no limits to the number of templates you can create in your account. So feel free to create multiple variations to help cover different scenarios.
Summary
Thank you for reading this far! We really hope it helped explain how templates calculate the quantity of parts for a particular project type. You have full control of how these templates are created, edited, and used, so feel free to customize to your needs!
And, as always, feel free to reach out with any questions!